This tutorial is all about how to capture an image using built in laptop camera. We will write a simple and clean code to perform this task.
NOTE: Before you go through this tutorial, please make sure you have read the previous tutorial on how to start camera using Python and OpenCV otherwise you might find this tutorial a bit difficult to understand.
NOTE: Before you go through this tutorial, please make sure you have read the previous tutorial on how to start camera using Python and OpenCV otherwise you might find this tutorial a bit difficult to understand.
- Today, you will learn a new keyword cv2.write() that will be used to capture the image.
- After this tutorial, you will be able to click your pictures with your own self made Python code. :)
1) Import necessary libraries:
import cv2
import numpy as np
2) Initialise the camera object
cap = cv2.VideoCapture(0)
3) while(True): #line1
ret, frame = cap.read() #line2
cv2.imshow('cam', frame) #line3
if cv2.waitKey(1) == ord('c'): #line4
cv2.imwrite('mypic.jpg', frame) #line5
elif cv2.waitKey(1) == 27: #line6
break #line7
You must be familar with #line1, #line2, #line3. If not please visit the previous tutorial.
In #line4 and #line5, we are checking for a key press 'c'. If the user presses the 'c' key on their keyboard then the current frame will be saved as a picture named "mypic.jpg" in the same folder where program is saved. The function imwrite() is used for this operation which simply takes two arguments i.e. filename and frame that you need to save.
In #line6, we see a new keyword "elif". In C or Java, we write this as "else if". Python makes it shorter by a word and makes it "elif" so its same as "else if". The condition that is checked in elif is whether "ESC" key is pressed or not(27 is ASCII for ESC key). If the "ESC" key is pressed and hold for about a second, break is encountered and we come out of loop.
One more thing worth noticing in #line6 is the use of "ord('c')". In simple words, "ord('c')" returns back the ASCII value of the character passed to it. Here 'c' is passed to it so we get 99(ASCII for 'c') as return value which is then checked with waitKey(1). If 'c' is pressed and hold for about a second, imwrite() function creates a new image file and saves the frame in that file.
4) Release the camera object and destroy all windows.
cap.release()
cv2.destroyAllWindows()
*************************************************
Here's the summed up code:
import cv2
import numpy as np
cap = cv2.VideoCapture(0)
while(True):
ret, frame = cap.read()
cv2.imshow('cam',frame)
if(cv2.waitKey(1) == ord('c')):
cv2.imwrite('mypic.jpg', frame)
elif(cv2.waitKey(1) == 27):
break
cap.release()
cv2.destroyAllWindows()
*************************************************
OUTPUT:
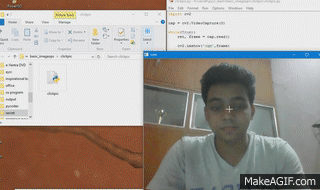
In the output GIF, when I hold and pressed 'c' for about a second, the picture named mypic.jpg appears in the folder where program in stored.
So that's it for this tutorial. In the next tutorial, we will see how to play a video file using your own code written in Python and OpenCV.
Any queries, please ask in comments.
Thank you
ret, frame = cap.read() #line2
cv2.imshow('cam', frame) #line3
if cv2.waitKey(1) == ord('c'): #line4
cv2.imwrite('mypic.jpg', frame) #line5
elif cv2.waitKey(1) == 27: #line6
break #line7
You must be familar with #line1, #line2, #line3. If not please visit the previous tutorial.
In #line4 and #line5, we are checking for a key press 'c'. If the user presses the 'c' key on their keyboard then the current frame will be saved as a picture named "mypic.jpg" in the same folder where program is saved. The function imwrite() is used for this operation which simply takes two arguments i.e. filename and frame that you need to save.
In #line6, we see a new keyword "elif". In C or Java, we write this as "else if". Python makes it shorter by a word and makes it "elif" so its same as "else if". The condition that is checked in elif is whether "ESC" key is pressed or not(27 is ASCII for ESC key). If the "ESC" key is pressed and hold for about a second, break is encountered and we come out of loop.
One more thing worth noticing in #line6 is the use of "ord('c')". In simple words, "ord('c')" returns back the ASCII value of the character passed to it. Here 'c' is passed to it so we get 99(ASCII for 'c') as return value which is then checked with waitKey(1). If 'c' is pressed and hold for about a second, imwrite() function creates a new image file and saves the frame in that file.
4) Release the camera object and destroy all windows.
cap.release()
cv2.destroyAllWindows()
*************************************************
Here's the summed up code:
import cv2
import numpy as np
cap = cv2.VideoCapture(0)
while(True):
ret, frame = cap.read()
cv2.imshow('cam',frame)
if(cv2.waitKey(1) == ord('c')):
cv2.imwrite('mypic.jpg', frame)
elif(cv2.waitKey(1) == 27):
break
cap.release()
cv2.destroyAllWindows()
*************************************************
OUTPUT:
So that's it for this tutorial. In the next tutorial, we will see how to play a video file using your own code written in Python and OpenCV.
Any queries, please ask in comments.
Thank you
No comments:
Post a Comment